If you have more than two kayaks then a DIY kayak trailer can save both your time and money. Making a DIY kayak trailer is not rocket science; with the proper tools and materials, you can easily make a kayak trailer by yourself. You will need a sheet of plywood or industrial plastic, a flat base trailer, eyebolts hex bolts, lock nuts, combination wrench, power drill, 25-inch PVC pipe, etc. to build a kayak trailer.
Key Takeaways
- You will need a base for your kayak trailer but in that case, it’s not mandatory to opt for an expensive trailer; you can opt for a used trailer
- The DIY kayak trailer making process has three stages: attaching the deck, building the bottom rack, and building the top rack
- You have to attach a solid deck on top of the trailer to protect the kayaks from various damages
- You should keep in mind that the number of racks that you build depends on how many kayaks you need to transport
Equipment And Tools Required & A Video To Follow
The necessary tools and equipment are obtained from your nearby hardware store and they include;
1. A sheet of plywood or industrial plastic
2. A flat base trailer that could be new or used
3. Eyebolts hex bolt, and lock nuts
4. 16mm and 17 mm combination wrench
5. Power drill, eight to ten 2 x 4 lumber, L brackets, and screws
6. Three to four pool noodles or pipe insulators
7. 25-inch PVC pipe, six zip strips
8. Self–tapping fasteners and kayak rack
Constructing the Base Trailer
You will need a base for your trailer which should be inexpensive since kayaks are lightweight. You can either buy new or used but in perfect condition. The harbor freight trailer is preferable since it is a solid steel base and easy to modify. A used trailer may be already assembled but for a new one, you will have to assemble it by yourself. You should follow the following steps:
- Assemble the tongue of the trailer and the two decks. You may ask for assistance from friends as it is heavy.
2. Using hinges, attach the docks on each side leaving enough headspace as you will need to fold the trailer over.
3. Attach and tighten down the suspension and axles
4. Finally, attach the wheels to the trailer. You should then flip it over and tighten the two decks of the bed. You can fold up the trailer to save space by removing the vertical set of casters behind the wheels.
Constructing The Kayak Rack
With the base trailer already in place, you now need to make it kayak-friendly by customizing it. The base trailer has to go through three building stages i.e. attaching the deck, building the bottom rack, and building the top rack.
Attaching The Deck

1. The first thing to do is to attach a solid deck on top of the trailer. The deck helps to protect your kayaks from damage when you are transporting them. You can use a half-inch plywood board to act as the floor.
2. You should then install parts of the kayak straps since you can easily access the frame. The frames have existing holes on the side and back which will help to fasten the kayak straps using eye bolts and locknuts.
3. After laying the deck flat on the frame, you should cut the corners of the deck to expose the hex bolt. Mount the deck to the frame using the hex bolt on every corner of the frame.
4. There are three sets of holes on the front and back of the frame. You should use the holes to bolt the three 8-foot 2 x 4s that will serve as support for the racks. You should then secure the 2 x 4’s using 5/16 hex bolts, 1-1/2 inches with lock nuts to make the trailer ready for the racks.
Building The Bottom Rack

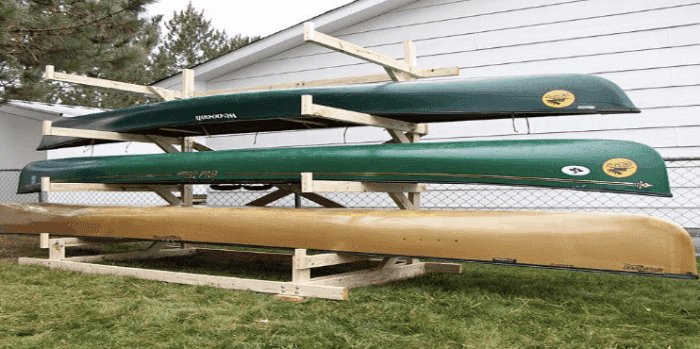
The number of racks that you build depends on how many kayaks you need to transport. If you have two or more kayaks, one rack will be enough but you will need an upper rack if you have four or five boats. The following steps will help you achieve the objective:
1. Start by laying two 6-foot 2 x 4’s across the three support beams horizontally which are crossbars. You should then attach them to the three support beams which will hold the kayak’s bottom rack. Finally, attach them with screws and L brackets.
2. You should then add pipe insulation or swimming pool noodles over the two crossbars to protect your kayak from damage. Using the zip strips, wrap them around each end of the crossbars.
3. Your trailer is complete if you have only two kayaks to carry and you can load them up and strap them down, ready to move. However, if you have more kayaks, you will require an upper rack.
Building the top Rack
The upper rack of the boat will be supported by the center beam on the base trailer. You should put the boats on the bottom rack to see the amount of space you have. You should leave a solid space between two kayaks measuring 30 inches. You should then carry out the following steps:
1. Measure a 2 x4 to your desired height between the bottom and top rack but you can adjust it depending on the size of your kayaks. But the typical height is 28 – 30 inches.
2. Attach the 2 x 4 to the middle of the supporting lower beam and crossbar using an L-bracket. Attach another beam of the same size as the first one to the beam and crossbar
3. To make the structure solid, you should connect the two beams with a 2 x 4 at their top and join the upper rack crossbars, then cut them to measure six feet.
4. Drill two holes in the center of the pipe and make them large enough for self-tapping fasteners’ heads to fit through.
5. You should then place the pipes horizontally and parallel to the crossbars on the base of the trailer. Drill the fasteners through the pipe into the posts.
6. To build the upper racks of your DIY trailer, connect the outer support beams, and cut four, 2 x 4’s to the height of the center post to make the PVC pipes sit level. The outer support posts sit on the lower rack crossbar and you should attach them with L-brackets on each side of the post.
7. The final step is to fasten the PVC crossbar to the outer support posts by drilling a pilot hole and securing it with a fastener.
With this DIY kayak trailer setup, you will be good to go and enjoy your kayaking with no hassle and pain of loading and unloading the boats anytime you are traveling! Let nothing stand in your way as you adventure on the waters!
References:
https://xgearhub.com/how-to-build-a-kayak-trailer/
https://roxom.com.au/tutorials/boat-trailer/how-to-build-a-kayak-trailer

Rockey is a kayaking enthusiast who has been kayaking with a local group for the last five years. He loves using kayaks while out on outings on the water or camping when the friends want to have a BBQ party somewhere on the bank of a local lake. More About James R Rockey at About Page Here: Authors
Based on his experiences with the different types of kayaks, he is sharing his opinion about kayaking tricks and required gears so that a beginner can get started right away.
Find his team on Twitter here. Happy reading!
