Making a kayak sail is not that difficult; with the proper equipment, you can easily make a kayak sail. In order to make a DIY kayak sail you will need a sturdy clear shower curtain, a piece of sturdy cloth, hose clamps, PVC pipes, PVC elbows & caps, bungee cords, etc.
Key Takeaways
- You have to cut the canvas into a V-shape because it is the standard design for most sails
- If there are no tunnel poles on the canvas then you have to hold the long sides of the already cut V-shape tent and sew them to create a tunnel pole
- You can use one of the tent tie-back hooks to secure the sail once folded to the side of your kayak
Stuff You Need To Make A Kayak Sail
As a start, you need to assemble all the required items. The following will get you started:
1. A part of a sturdy clear shower curtain for the window
2. A piece of sturdy cloth for the sail probably the side of an old tent
3. Two small automotive hose clamps
4. PVC pipes
5. Two PVC elbows
6. Two PVC caps
7. Two bungee cords
8. A camera bag strap
9. PVC glue
10. Kayak eye pads
11. Paracord
12. One hold-down strap from the tent
13. Suitable sewing thread
14. Hemming tape
15. A sewing machine
Once you get all the needed materials, it’s time to sew the sail.
Step-by-Step DIY Process
Here is a video from uberfy to guide you on the process.
1. Cut The Tent Into A V-Shaped And Hem It
After getting a piece of the canvas, you need to cut it into a V-shape, which is the standard design for most sails. Hem it all around manually with the narrow side being the previously screened window of the tent. Cut out the small side and sew in the sturdy clear shower curtain to make a window. Avoid stitching directly to the plastic when creating the window; instead, use hemming tape to reinforce it. Cut any excess material and hem below the window to make your work neat.
2. Put The Pipes Through The Tunnel Poles On The Side
If you had cut out the side of the tent, there might be tunnel poles already. You need to extend these tunnels on each side so that the poles can go through. If there were none, fold the long sides of the already cut V-shape tent and sew to create a tunnel enough for pipes to pass through.
Create a gap almost ¼ length from the broader side on both edges where the hose clamps will be used to clamp the paracord and the two bungee cords. Tie the paracord directly to hose clamps put on both long sides. You need to glue all the PVC connections for reinforcement.
3. Strap The Sail Into The Kayak
Take the camera strap and connect it to already existing eye pads on the front side of the kayak (Each side). Avoid making permanent holes on the kayak until you are confident of the whole process, so for a start, use the existing eye pads. Strap the sail by running the straps through PVC Ts, where the pipes are meeting at the narrow side of the already-made sail.
Now tie a piece of paracord around both camera straps and open the end to keep the two portions of belts together. You can stitch once the sail is tested to work well. Leave the strap a little slack to allow the sail to lie down to its resting position. Attach the two bungee cords in front of the kayak to the hose clamps where you had attached the paracord.
The paracord should run from one hose clamp on both sides of the sail then through the four bolted eye pads to hold down in between. It should form a loop around the cockpit of your kayak. Put the forward eye pad next to you when sitting on the kayak without letting it obstruct your paddling. The other two eye pads should be behind the cockpit where the paracord runs through.
Do not run the paracord around the skirt groove if planning to use it with a sail. It is not safe at all.
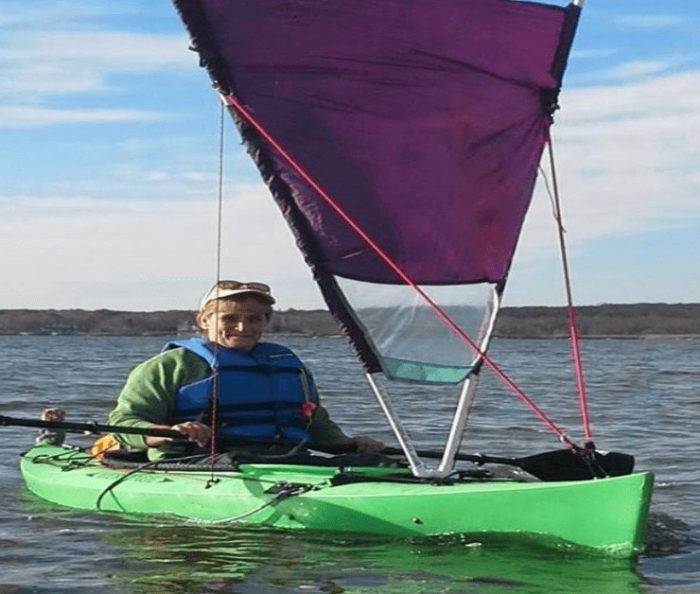
Your sail is ready for kayak sailing once the strapping process is through. Your end product should be similar to the one in the picture below:

When the sail is strapped as well, it will also fold down to the side when not in use. Use one of the tent tie-back hooks to secure the sail once folded to the side of your kayak. Ensure you secure it when already in the down position.
Final Take
Take your time and follow the steps above for fun-filled practice. It will save you money, plus the experience and enjoyment of doing it are worth it. Note that you can always use any other sturdy materials to make the sail, but the process is the same. Try it out and see how easy it is to create a sail for a kayak right at your home!
References:
- https://anchor.travel/how-to-make-a-sail-for-inflatable-boat/
- https://graysoncobb.com/homemade-kayak-sail/
- https://www.instructables.com/CanoeSail/
- https://www.explorationjunkie.com/kayak-sails/

Rockey is a kayaking enthusiast who has been kayaking with a local group for the last five years. He loves using kayaks while out on outings on the water or camping when the friends want to have a BBQ party somewhere on the bank of a local lake. More About James R Rockey at About Page Here: Authors
Based on his experiences with the different types of kayaks, he is sharing his opinion about kayaking tricks and required gears so that a beginner can get started right away.
Find his team on Twitter here. Happy reading!
